
I then changed the image from CMYK to greyscale.


After greyscale was completed I made a duplicate of the image just incase something went wrong and then I still had a backup.


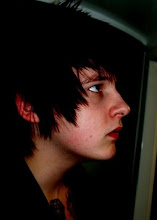
I then got the burn tool out and drew over a lot of the image to darken and rough it up so it looked interesting and dark in feeling.


To keep attention to the image I coloured in the corners so they lured the eye into the centre of the page.


There was a little situation which happened to occur as I was working through the images and that was that 3 of my images were landscape when looked at.


For the moment I ignored this and chose to move onto this problem once I got to the book lay out and order.


Once all darkened up I lightened up highlights using the dodge tool and sponge tool to make certain areas really pop.


I added my graphic signature/ logo at the bottom instead of doing some fancy writing saying my name.


Once completed I used the burn tool to go around the shapes of the main images and give them some shadow and depth which looked really good left the image looking like this:


No comments:
Post a Comment