Friday, 28 May 2010

Evaluation

1. What skills have you developed through this module and how effectively do you think you have applied them?

During this module I feel as though I have developed a series of different skills ranging from areas such as documentation on blogs all the way to 3D design. In essence I believe that I now have a better understanding of what it takes to make a well structured blog which delivers a clear story. My 3D work could have been a lot better but due to the workshop being so busy at this time of year I was not able to do a lot of things I wanted with the box which I wanted to.

I have started considering different media approaches and distribution such as 3D and digital. I did not apply my digital media as well as I would have liked as my ambitions were narrow to begin with as I did not want to give myself a major workload and over complicate my time and effort.

2. What approaches to/methods of research have you developed and how have they informed your design development process?

Research has been a stronger point for me during this module in particular due to the fact I am creating work for a statistic based audience, my questionnaires helped me out so much in defining whom my target audience is, what they wear, where they go, what they drink, when they sleep, where they shop etc.

I also think the structure of my research is the best structure yet. I used to just do all my context at the start of a brief then it was done with whereas with this brief I have juggled the two, relying on both to get me further on with my project. It has allowed me to be a lot more comfortable with my project with a clear direction of where I was going.


3. What strengths can you identify in your work and how have/will you capitalise on these?

My development skills, constant analysis and evaluations have been a great strength in this project, Without these my project could have drifted off into no where. Keeping on top of my documentation has allowed me to refer back to my work with a clear understanding of what needs to be done and when, so I am not using my time un-efficiently. My commitment to final products has been at an all time best and has allowed me to learn different ways of working using other facilities around the college.

4. What weaknesses can you identify in your work and how will you address these more fully?

My main weakness yet again is time management I believe that I need to book in the print room next time so I have a deadline for my work to be ready for, without any concerns with drop in being booked up or design boards not being printed out in a quality way. I think this is a vital area in which I am losing marks for in the project which is why I must be prepare my self for third year when all this and much more is expected of us.

I think I also need to produce more ideas at the start of a project as it seems although I am producing 20-40 ideas I should be doing so much more which would allow me to work out a fall back plan if anything was to go wrong with an existing concept in a crit or via statistics being incorrect/ just not working as a design.


5. Identify five things that you will do differently next time and what do you expect to gain from doing these?

1. Pay attention to workshops that are available and take more dedication in producing a 3D product rather than getting scared about time and rushing delicate areas such as the finish.

2. Be constant of my time, although I had a lot of time to do things, I didn't think about expanding what I could do. It was in my grasp to take this project and do so much more with it rather than a box, I could of made the digital distribution in after effects and made everything much more interactive.

3. Learn from my mistakes, think back to previous projects and notice what the problems were, in order to prevent me from making the same ones again on a new project.

4. Think about more ways to tackle one task, sometimes the easier idea could be much more interesting and look better and in all honesty ( be cheaper)

5. Book in at the digital dungeon at the start of the project so I am ready to print off boards and finals for crits.

6.How would you grade yourself on the following areas:

(5= excellent, 4 = very good, 3 = good, 2 = average, 1 = poor)

Attendance: 5

Punctuality: 5

Motivation: 4

Commitment: 4

Quantity of work produced: 3

Quality of work produced: 2

Contribution to the group: 3

Thursday, 27 May 2010

Design Boards

For my design boards I thought it would be nessecery to include a board with vital information from the start of the project allowing people to understand what it was I set out to do and how I got on with accomplishing it.


I then included a board on design and development which shows where I first started out with the idea I wanted to take forward and how it progressed in stages to where it is on the final boards.


The rebrand and packaging was an interesting one to take into consideration as I had to show what the logo looked like before and what it is now to show the contrast between the two and how much stronger the new one is .


Digital distribution says what it is on the tin, It shows how Kleenex will be advertised using social networking as a tool for communication.


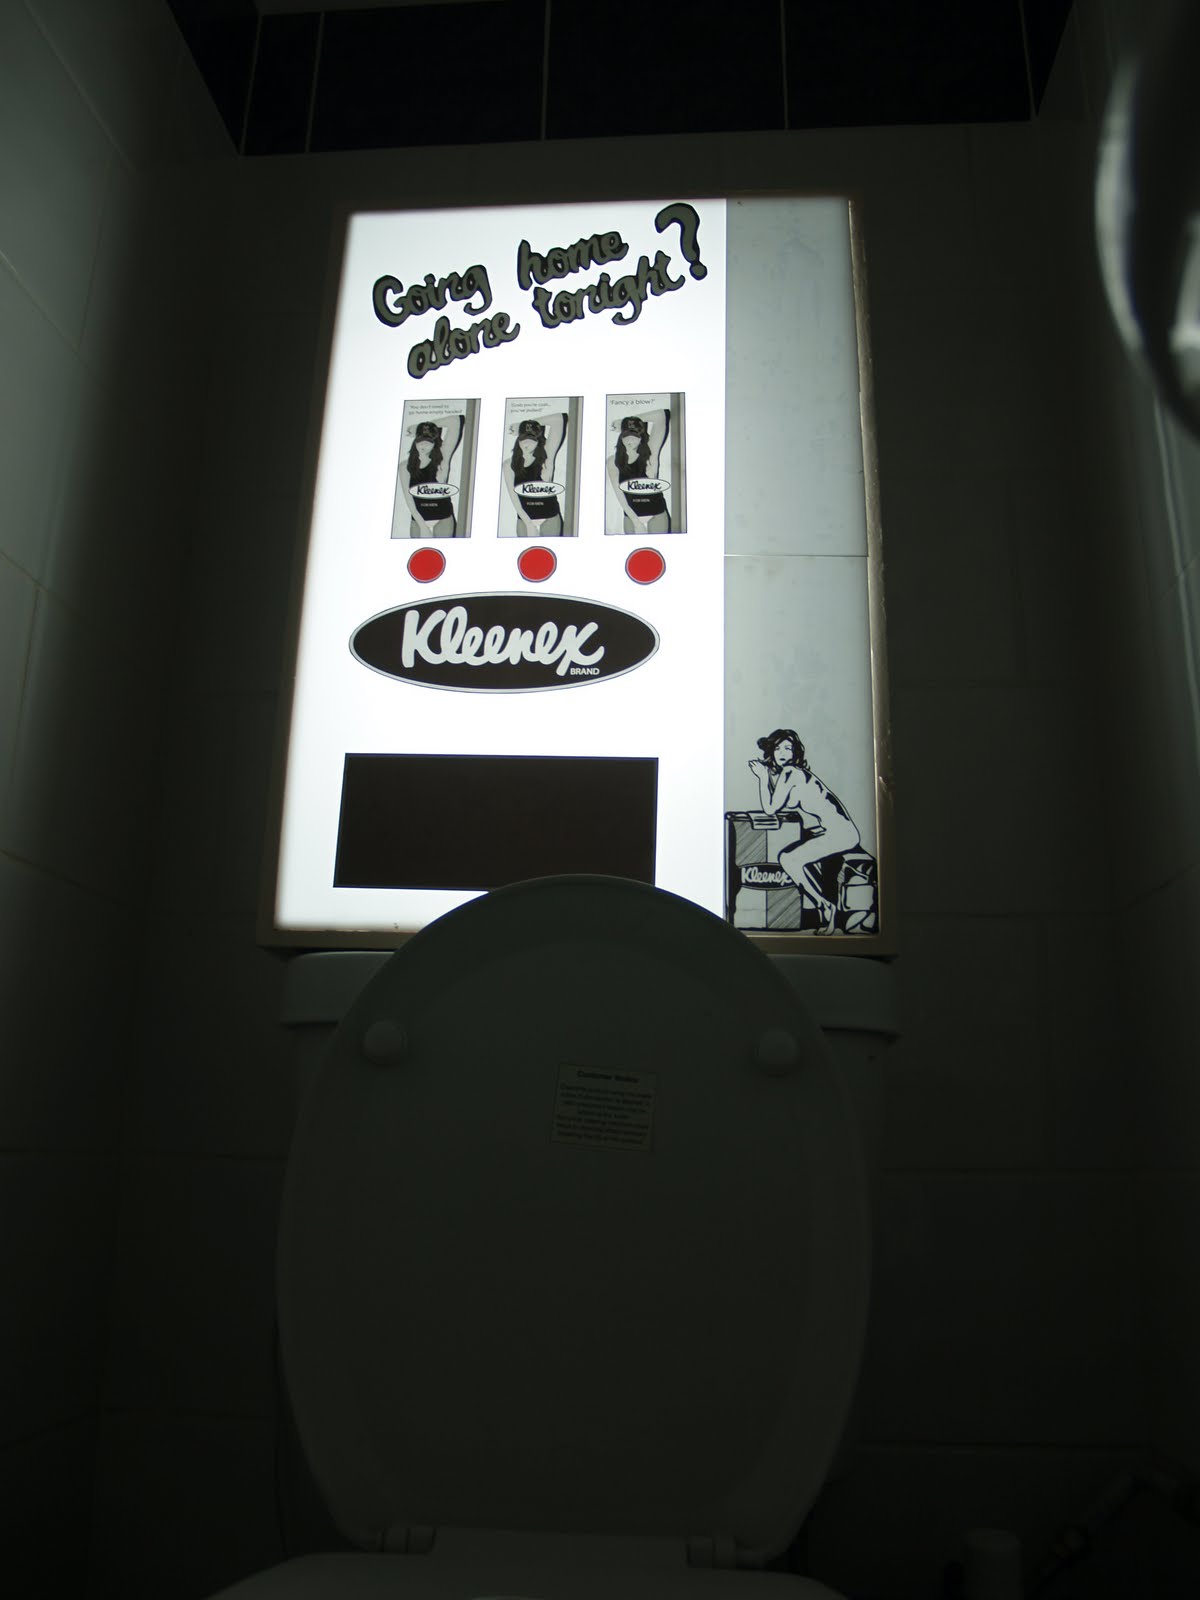
Finally the image in context, of what I produced as my final phsycal product and it stationed in a bathroom.

Edits

I tried a few edits to see what kind of effects I could get on the photo and wether or not it would look better as a plain photo or better photoshoped.


I think the sepia light makes the colours in a wrong contrast and sets the tone in a more erie kind of mood which does not link in very well with the idea.


The AV texture looks interesting in static but I think the colour is vital towards this final for it to work well.


Again as cool as the image is on photoshop in a drawn kind of filter it needs to be a phsycal out come.


Which is when I decided a slight bit of alteration on the product is all that was needed and in the end I think it looks really good like this and it gives the product an interesting kind of power.

Context

My final photographs are of the dispencer in the context of a bathroom, the arora from the lights box makes it the main priorty of attention in the room and is positioned in a place it cannot be ignored.


I took a few angled shots to see whch would look better for my final design board, I think this angle makes the machine look slightly odd and flat.


The problem with this photo is that no one would ever be looking at the machine like that unless they were being sick and I am pretty sure paying for tissues is the last thing they are thinking about unless there is no toilet roll about.


The final image is from the pee position. from a mans point of view looking down upon the machine as there is nothing else for him to look at, he takes in the information and has a drunken giggle to himself

Complete

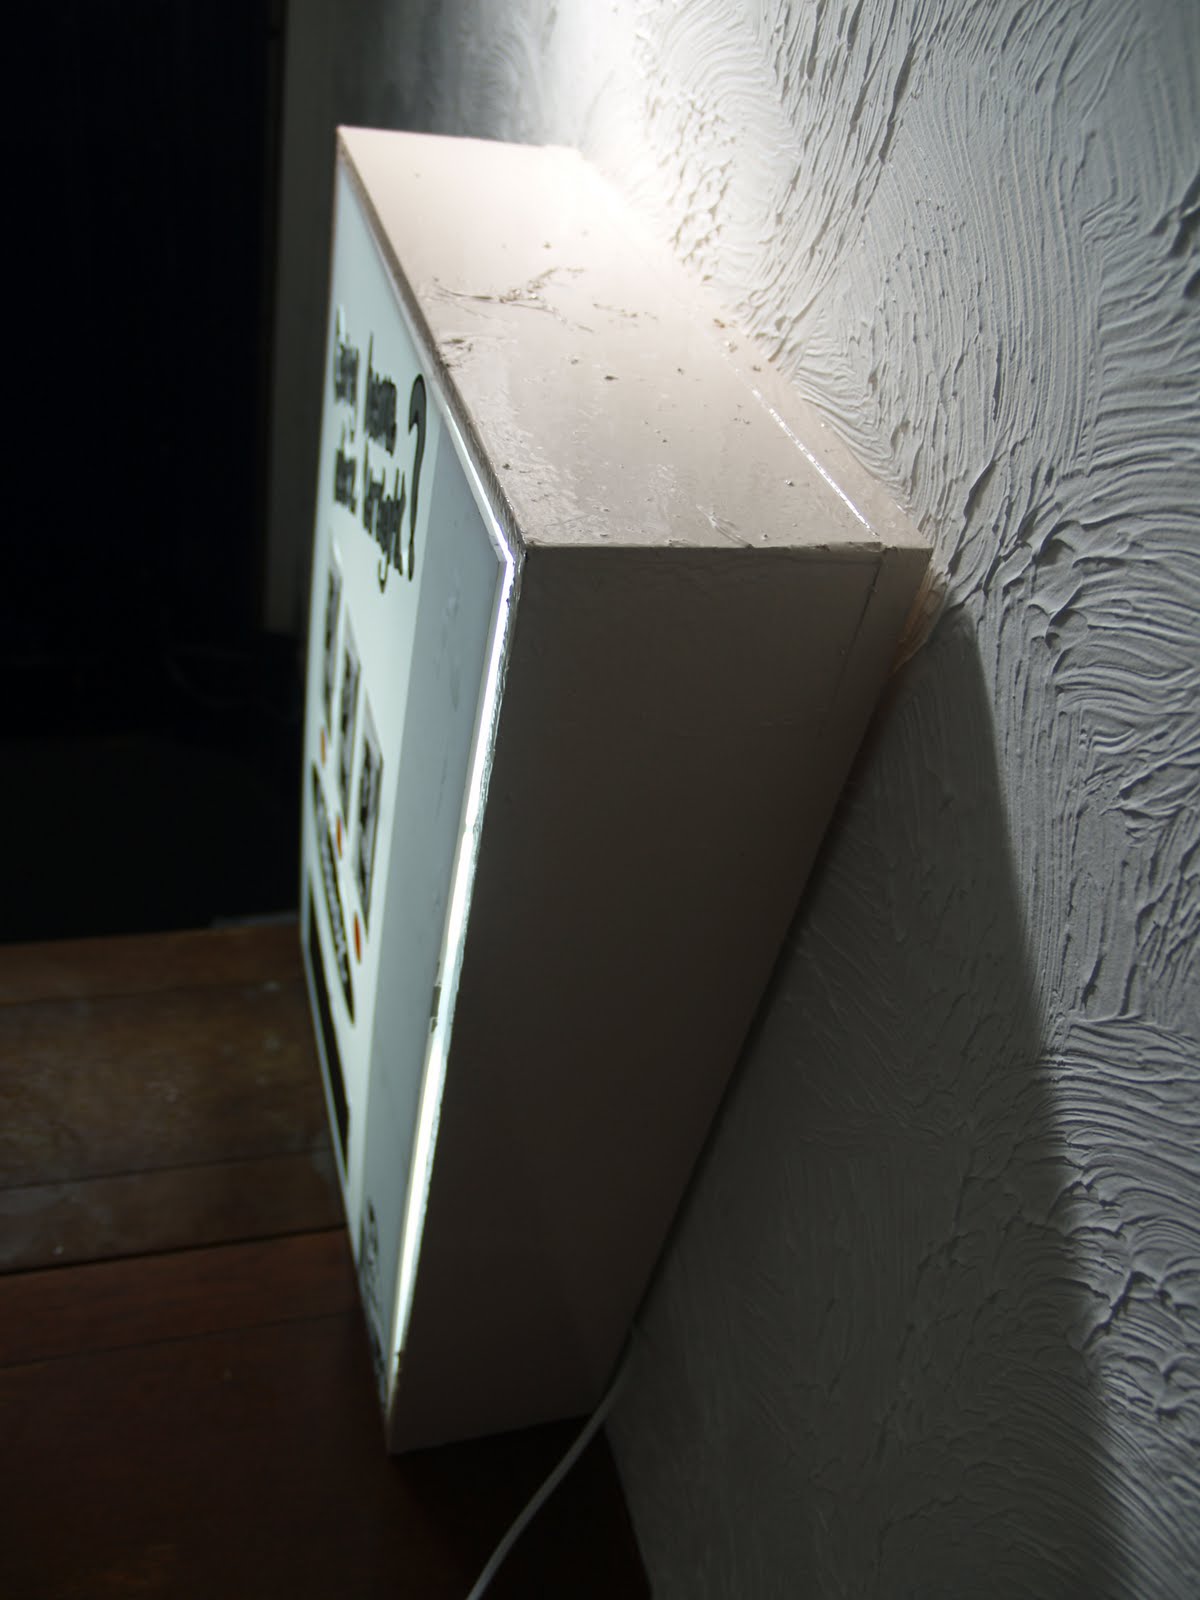
The last thing that had to be done to my box after it had been painted was to install these light links I bought which were quite pricey then I had to drill a hole in the back after I put the light componants together and simply wire up the plug ready to introduce light to my project.


The perspex fitted nicely to the box and the box worked well as a bold piece however if I had the chance to do the project again I would do a number of things diffrently e.g. paint the box inside and give it as many layers as I could.


As you can see there is some bad painting on top where a lot of flys decided to commit suicide, the lumps on top is from where I picked them out.


Other than that the light box worked quite well and looked really good, if the 3D workshop wasn't so hectic I would of liked to produce the stickers and apply them to a 3D MDF mould to make the machine really pop.


All that is really needed is some photo shop to add depth and make the machine have a little more character.


My only issues with the project is that it is to flat and the stickers were not big enough for the side pannel and it is obvious


The machine looks good in context of where it is being used and someone is pressing the button to receive an item.


Although it is a sticker this photo makes the machine look asthough someone is actualy inside the machine collecting the project

Wednesday, 26 May 2010

Digital mock ups

To begin with as I am not actualy making the website I would go through what happens when the site is used. the buttons will increase in size by 25% when hovered over with the mouse, as well as this the colour will be highlighted so it is clear that you click on it. A mock up of the size and light is shown below:


So after the link is clicked on facebook it takes you to this page below: which is designed to be made on flash. The page will flash like a dim toilet light and the machine will light up, the camera will then move towards the box like someone was walking to it.


Then when the image is zoomed in it will give the selection buttons to three diffrent areas:
-Information
-Games and
-Merchendise


Again designed to be mocked up in flash, this is the game. the game is simple, the desk will have diffrent male objects as the lego goes on, promoting Kleenex and a male stereotype of things that would be on a mans desk such as pen, food, mess in general. The object of the game is to clean away the stains that appear on the desk.


Merchendise is simply an order form inwhich a free A3 poster is sent through the male after the person has registered and filled in the boxes on the left hand side.


The final webpage is information which I am yet to mock up but I will produce later on tonight to show you what it will look like.

Picasso hasn't got dirt on my drawings

My product is being delbt with digitaly via social networking, the most popular site for this is facebook which allows a good 20% of the page to advertisments. From this link on facebook a directlink will take the user off the social networking site to the Kleenex one.


On the site I am including a free A3 poster in which the male can order from the website by simply putting in his details. Name address number and email.


I will also be including a game which is specialy made for the product


The game is simple enough, you control a hand which has to clean up stains on a desk.


These stains will be male mess's such as take out food .


The home page will be a digital mock up of the machine and there will be three sections in which you can select diffrent areas of the site.

Monday, 24 May 2010

Type.

Creating the appropriate typeface, wow this was a tricky one, I wanted to use a comic pin up poster styled type, which I found really hard as I had to make the typeface joined up in order for it to flow. Certain letters linked better together than others such as 'Goin' out of going, the lowercase g looks lost, and in all honesty it was just one of many g's that I tried to make flow well with the type.


In my research it showed that using a colour appropriate to the product was a popular idea carried out, and a background colour was another concept, I tried a light blue with a yellow, but in my opinion it made my eyes funny and didn't seem to be in the correct context at all of what I wanted.


This was when I thought I better bash out a few colour concepts to see what works and what doesn't and wether it was my typeface that was the problem or simply the colours being used. After expermienting with a selection of diffrent coloured type I noticed that using a light background lost the images purpose. where as using a dark colour such as a cool black/grey as the backing colour with a lighter colour on top really made the type pop.


To be sure I put a select few on a mock up of the machine I digitaly produced, it seemed that the lighter colours didn't stand out and it ws the last thing I looked at, if I even looked at it, itwas at that point that I decided upon using a dark colour for tones purpose.


Black and white was a consideration, all black was disgcustingly messy, black and white looked good but not correct because it was far to plain, when I putit on the box it seemed very lost in all honesty so I knew I had to do something with the colour but I had to be careful with what it was that I did.


which is when I chose a dark grey colour and took it into photoshop to burn the edges for a tone effect to make the image look as interesting as possible. This type face is stating a question to my audience in a friendly fun mannor to which the reply is 'bloody looks like it' (cleaned up) which is hen the rest of the box is seen and then the person would have a laugh about it, possibly spread the message of the humor of this machine by digital distribution - a photo or by a psycal purhase.


Which leads to the aim - to persuade young men to purchase Kleenex tissues, this will persuade my audience because it will give the tissues name a lot more of a bad boy edge which will lead to a greater respect to the brand which in the long run will make them cool.

Solution to illustrations

As pointed out before there were a few key elements in which were in need of altering before I went to print. I changed some of the strokes of lines and thickened her body out, after that I sorted out the area of hair which made her look as though she had a horn, then I changed her nose by deleting some of the detail and putting the two shaded areas in towards eah other, this gave her much more of a femanine nose and changed her looks a lot. I still think she could be more attractive, but beauty depends on it's beholder. Which is why I am stopping it here, or I could design for an age before I am happy.


The only issue with my tissue package, was infact, she had a package. the only thing I did to alter this was change the colour of the underwearto a lighter grey to contrast with her tank top yhis instantly drew attraction away from her crotch area and made the image fit into place appropriatly.

Wednesday, 19 May 2010

Crit

Major issues raised is that my products females have a few problems with their design... the kleenex lady on my packaging has a problem here:


She has some junk in her trunk. I had noticed that this was a little issue but I thought that I could of got a way with it. I think the use of colour was wrong which made this appear to be as it is. If a grey was used it then wouldn't be as in depth, but as the tank top and underwear are the same colour it makes the image bigger and makes she look like a he, which is a little nightmare in the campaigns success, So I need to sort this out ASAP.
and my pin up woman's main problem is here:


She has a horn? and her face is a bit off putting... which is annoyingly true, I just can't make her a beaut, which means I should back off it and stop polishing a turd.

Other than that, people knew what I was doing and liked it but some girls agreed it worked but thought it was dirty which is the response I wanted, other issues raised were that the solution to the brief was to focussed in comparison to the brief being open, which I disagree with on certain elements as I have already stated in development information along as how the product came to be and how it works. I believe if it wasn't such a tight solution the project would have to many gaps and never end.

So it begins.

I went down to 3D design to discuss what would be needed to make my Kleenex machine. It ended up in me having to wait 24 hours to begin production which knocked my time schedule about and meant I wouldn't have visuals for the crit unfortunately. However I was able to start making my machine first thing the day of the crit in hope for it to be finished that day. To begin with I had measurements with details on the and thickness etc. So all that then had to be done was cutting out the outer frame of my box. I got to use the big saw which made me happy :).

It was a interesting and exciting experience seeing parts of a development come together, after my four strips were ready I then set a 45 degree angle to the saws blade in order to get a crisp finish in which the fixtures would then fit together as a hollow square.


Once this procedure was complete I then had to place a single rebate in each of the four edges of the wood to make a fixture for the Perspex. I then had to carefully cut out strips of tinfoil and glue them to the inside pieces of my wooden frame, making sure the tin foil was neat and did not cover any of the edge, Which then resulted in a image as so:


The reason these strips of foil were applied will be clear later on in the blog, after a nice long wait it was then time to attach each of the parts to one another to make one solid piece. I used glue on the edges and then made sure the parts lined up correctly, to avoid a parallelogram scenario. To make sure that the wood dried with the correct angles I attached to bungee corded clips to the top and bottom and made it nice and tight so I had a strong outer structure.


I then left the product to dry for 40 minutes. I came back to it after that period of time and it had dried perfectly and it all lined up just right, which pleased me and made it possible for me to move on to my next step.


Which was to cut out the back, again i used the saw to cut out a big sheet of 18 mm MDF to a size of 658x457 mm. After this was done, I then had to cover one side with tin foil leaving a 18 mm gap for the rest of the structure to be attached.


As time was running out on my day in the workshop I had to call it a day to my disappointment but with the little time I had left I was able to stick the back board to the front frame, ensuring that the rebates were on the front so the perspex could slot in perfectly, which looked like this:


As you may notice the inside is all filled with shined foil, this is because what I am making is a light box, I am going to be fixing some link lights to my product on the inside and the foil will work as a reflecting component which will display a lovely outer glow on the perspex making the product light up and seem more attention appealing.

My next task is to take the box down to a place called 'Falcon electrical' in leeds:


I plan to do this tomorrow and purchase some link lights. The issue of not being able to do it tonight is that it is shutting in ten minutes and I need to take my box down which ways a ton and needs to dry over night in order to get a strong setting.


Wish me luck with touring around Leeds in search of this place with my MDF product.